
10 Tips on Avoiding CPU Issues in MainStage 3
Written by Kirkland Russell
Founder of Worship Start
My worst performance nightmare happened a few years ago during a set in Toronto. I came up after the sermon with the band and we started playing Bethel’s ‘It Is Well,’ which features a piano intro. As I started to play, I began to suffer from the most intense audio dropouts I’ve ever experienced. It sounded like my piano was inside of that slap chop commercial, with that guy chopping out the audio every half of a second. There was no recovery without stopping, and I began to lose all sense of time. With nobody else playing, and a few hundred people staring at me in silence and ready to respond in Worship, I just stopped playing.
You may have had a similar experience (or worse), but most MainStage users know that live performances can be disastrous if CPU isn’t properly managed, or you are not set up correctly. So I want to share with you a few tips and tricks I’ve learned over the years to help you avoid suffering from CPU spikes, harsh feedback, audio drop outs, MIDI FX not responding, and other potential issues.
Use Aliases.
Aliases reduce your RAM and CPU load because they reduce your MainStage concert’s resource usage. Here is how they work: Let’s say you have a set with 5 different song patches, and they all have the same piano in them. Instead of creating 5 separate instances of the same piano in each patch, you can create one instance of piano in patch 1 and create aliases (or copies) of that piano in patches 2-5 that link back to—or are sourced from—the original piano you created. Essentially, MainStage only has to process 1 piano, applied to all five patches. This is what an alias is—a copy of a virtual instrument that connects back to its primary source.
DISCLAIMER:
If you’re thinking about using aliases, there are a few limitations you need to be aware of. Every time you make a change to any instance of an alias, it changes every alias you’ve made in your concert, including the original channel strip. In other words, changing the piano alias EQ in patch 5 will also affect the aliases in patch 1-4. So if you want to change the piano in patch 5 only, you will need to convert the alias back to a normal channel strip by navigating to the gear icon in the channel strips workspace and clicking Convert Alias to Original.
This is obviously a primary example, but if your concert features heavy layering, lots of processing plug-ins, or lots of patches lined up, then you can really use aliases to your advantage. To create an alias, copy the channel strip, click edit in the header menu, and click paste as alias.
2. Set your preferences correctly.
This one may be obvious, but it is without a doubt the most important step to ensure your MainStage runs fluently. First things first, navigate to the audio tab in MainStage preferences and double check the following settings.
Sample Rate: 44.1 kHz
44.1 kHz is standard. If you are using an external audio interface, the Sample rate should be set to the sample rate of your audio device.
Display audio engine overload message: ON
This setting isn’t really necessary; I just like having it on so that I can diagnose the problem easier in a live set or practice.
Globally disable feedback protection: OFF
Always. Keep. This. Off.
Next, click on “Advanced Settings” and ensure the settings are set correctly:
I/O Buffer Size: 128 or 256
These are standard buffer sizes that yield lower latency times. If your MainStage concert features heavy processing or layering, change to 512 or, in rare cases, 1024.
I/O Safety Buffer: ON
MainStage adds an additional output buffer to protect against overloads due to unexpected CPU spikes. Although it adds a very minimal increase in latency, it is always safer to have this on.
Driver Latency: MORE SAFETY
Changing this setting to “Less Latency” seems appealing, but I urge against it. All this does is increase the risk of audio glitches and dropouts because you are giving your computer less time to process all of the information you are sending through it.
CPU Usage: FULL.
3. Map your faders to bypass plug-ins.
A common misconception that some people have is when the volume is down on a track, it doesn’t take up CPU. This is false. Just because you have turned down the volume and you see no signal coming through on the level meter, the computer is still using CPU to run MIDI information through the VST. To better understand this visually, change your concert settings to pre-fader metering and you’ll see that regardless of your fader being all the way down, dry signal is still getting sent to the plug-in.
To get around this, there is a nifty trick that I use when I have lots of layers and patches in my rig. When I map a fader on my Nanokontrol (or my controller) to a specific parameter, I also map the fader to bypass the plug-in when the fader reaches the bottom. This is extremely beneficial for saving CPU because it eliminates the CPU load of the plug-in at a time when we don’t need any volume from it anyways. In the screenshots below, I’ve mapped a fader to bypass the Vintage EP Plug-in using a custom scale parameter:


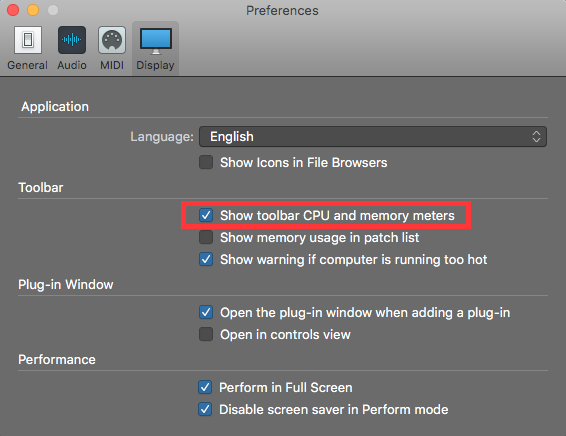
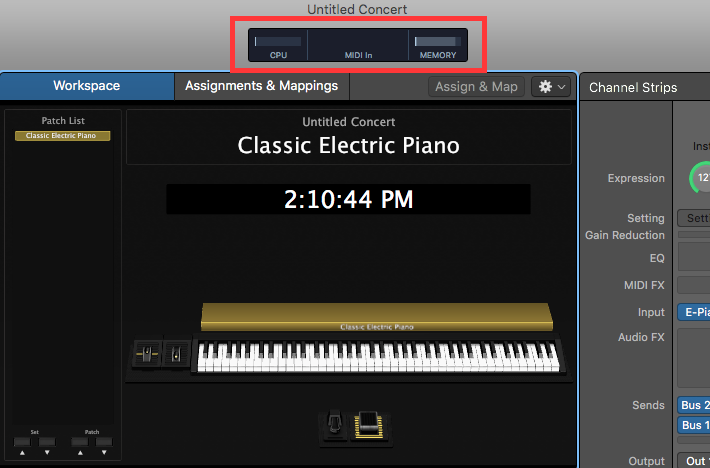
4. Show Toolbar CPU and Memory Meters.
Navigate to MainStage preferences —> Display. Turn on “Show Toolbar CPU and Memory Meters.” Although this doesn’t actually save your CPU, it is a fantastic preventative measure. Checking this on gives you a visual indicator of when your CPU is running off the rails, and how much memory your concert is taking up. If you see that your CPU is peaking, you can take time to make adjustments instead of figuring it out the hard way on stage.
5. Use auxiliary tracks for audio FX buses.

A common example of an effects bus would be a global reverb send, where different amounts of dry signal from each instrument in your patch can be sent to a single effect (ex. reverb), located on a separate auxiliary track. This has two major benefits, and the first is that it significantly reduces your CPU load. Effects such as Space Designer Reverb, pitch processing, as well as various chorus and delay plug-ins take a heavy toll on your CPU, and it is much more intuitive to send 10 instruments through one effect than it is to set up ten instances of the effect (i.e. the same reverb on all ten instruments). The second benefit of using effects buses is that it provides a more cohesive sound across all instruments in your patch. For example: In a global reverb send, all channel strips are being sent to the same reverb and reverb settings, and they will all exist in the same sonic space established by that reverb.
6. Turn off Auto-Save.
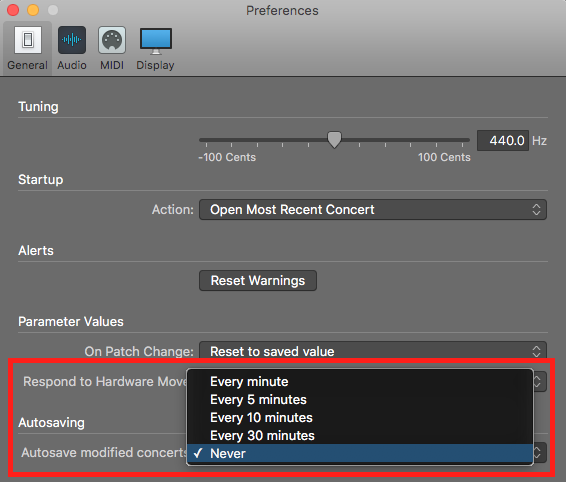
Auto-save is handy for building templates and concerts, but when it comes to performing, it can do more harm than good. MainStage is set by default to auto-save your work every five minutes, and it takes more out of your CPU every time it does. And if you are anything like me and prefer performing in EDIT mode, you do not want this setting on. It may tip your CPU over the edge, and this setting is also known to cause other issues, including MIDI FX not working and MIDI notes sustaining/hanging. To change this setting, navigate to MainStage general preferences and set the dropdown to “NEVER.” If you do this, just make sure you manually save your project frequently.
7. What Computer are you using?
If you’re running a 2010 Macbook Pro with 4 GB of Ram, chances are you’ll run into a lot of problems. Computer speed, storage space, processing, and RAM matter tremendously—especially with a CPU-intensive program like MainStage. In order to run MainStage without any hiccups, I recommend:
Macbook Pro, 2015 or later; capable or running MainStage 3 version 3.4 or higher.
2.2 GHz Intel Core i7 processor or higher.
8 GBs of RAM or higher.
8. Where are you playing, and for how long?
This is not often talked about with regards to CPU issues, but the context of where you play and how long you’re playing matters.
WHERE:
A few years ago I had the opportunity to play at a festival in Toronto called Big on Bloor. I was using MainStage in 86+ degrees Fahrenheit outside with no shade, and I can tell you that my mac performed differently. It was slower, louder, and I ran the risk of the mac internally overheating. This might vary from case to case, but it is always better to practice caution and cover your computer if it is exposed, or ensure that you are playing in a covered area.
HOW LONG:
I’ve also played full-day conferences with 5-6 sets throughout, and I can say from experience that MainStage does not function well once it has been left running for 8 hours. It is important to give your computer a break when you take a break. Either quit MainStage, or shut down your computer if you have the time to do so in between sets.
9. Close down all applications.
To avoid unexpected CPU spikes, it is always best practice to close and exit all applications other than MainStage. This means:
Web browsers like Google Chrome, Safari, Firefox, etc.
Any applications running in the background (check the right side of your header menu).
Turn off WIFI.
Turn off BlueTooth.
10. Avoid CPU-heavy plug-ins and processing when you can.
Alchemy, Ultrabeat, Space Designer Reverb and pitch shifting FX are plug-ins that take up a large chunk of your CPU. If you can, try to substitute all instances of these plug-ins with alternatives. For example, use SilverVerb instead of Space Designer, or try ES2 or RetroSynth instead of Alchemy. If you love a certain sound and don’t want to use an alternative, just make sure to use the bypass insert trick in #3.
I hope these tips help you avoid critical CPU issues moving forward. If you’re looking for more MainStage resources, visit some other blog topics, and make sure to check out our Worship Start MainStage Template and download it for free if you’re a member.


